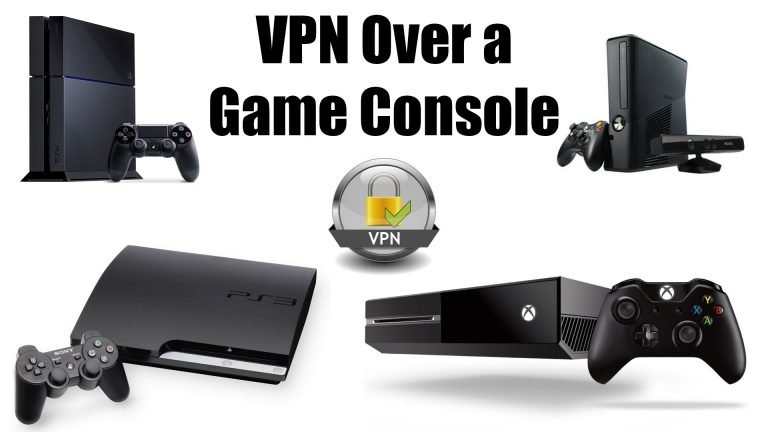
Most VPN providers do not have this specific tutorial available, and do not necessarily fully support VPN through Xbox, PlayStation or any gaming console for that matter. Tech support will not be able to help, other than resolve issues with using VPN through your router. Hopefully this guide is easy for you to understand, and will give you a clear understanding of the different ways you can connect your gaming console to a VPN. This guide can be applied for Xbox One & 360, PlayStation 4 & 3, Wii U, or any other device that does not have native support for VPN settings. A similar guide can be found for Apple TV here, and applies for Mac OSX users.
How to use VPN on Xbox & PlayStation with a VPN Router
The best way to connect your gaming console through your VPN connection is using a network router, but setting up VPN on a router is not always doable depending on what model you own. First, you should know that the majority of consumer Wi-Fi routers come with limited firmware that does not provide any protocols for personal VPN settings to be entered. Advanced users and computer network nerds are accustomed to ‘flashing’ their router’s firmware to something else. The term ‘flashing’ is used to describe replacing the original software the router came with originally to a more advanced and capable open-sourced option.

The main advantage of using VPN on capable network and Wi-Fi routers, is that any device that connects through Ethernet or wireless connection is automatically being encrypted through the VPN server. You can ideally have all your devices routed through a single VPN instance and be sure that it is as reliable as running the client on your device. There are no leaks that can occur, and speeds should remain optimal. Of course, this is what makes it applicable for Xbox One, PlayStation 4, Wii U, Apple TV, Roku, or any other internet hardware that otherwise could only use SmartDNS.
The most popular firmware options to use on routers are DD-WRT and Tomato, with many variants, all capable of connecting to VPN servers through OpenVPN protocol. To learn more about DD-WRT and Tomato, read my complete guide here. But, to reiterate some of it here, let me start by saying that flashing your firmware will void your warranty, and can render your router obsolete if done incorrectly. It is a technical process that can be challenging for many, but if you’re up for it, it can be done and there are plenty of tutorials and guides available per router model based. DD-WRT has the highest compatibility rate, and you can check if your router is on the list, and follow the guide on how to install.
Since there has been an increasing need for better consumer router firmware, users that do not want to flash firmware themselves do have out-of-the-box ready solutions available. Both DD-WRT and Tomato make a great choice, so you should not sweat that choice too much, but instead focus on a router that will fit your needs and budget.
For those that want a pre-configured router, FlashRouters and RouterSource offer the best service on the market. They have a large selection of preconfigured routers for DD-WRT or Tomato, and although the price is much higher than the original cost of the hardware, you get full after-sale support to setup your VPN connection if needed. Another option is TorGuard, offering lower prices on VPN DD-WRT routers, but with less overall support.
If the price is too steep, the next best option is to select an Asus router that comes with Asus-WRT, a stripped down version of DD-WRT that fully supports VPN, or even one of Buffalo’s routers that comes pre-installed with DD-WRT. You can also check out our top DD-WRT router picks, or even our favorite routers for VPN use.
Setting up a VPN connection on your router is very easy, no matter if it is on DD-WRT or Tomato. Almost all service providers fully support, and encourage this type of setup. They often provide full visual tutorials on how to obtain the server information and input it into your router’s settings. Once that step is complete, all incoming and outgoing traffic to any connected device, including your gaming console, will be on the VPN server.
How to setup VPN on Xbox & PlayStation using Windows Network Sharing
(Not as secure or reliable as using a VPN router, and not fully supported by service providers.)
Windows allows you to share your computer’s internet with the Xbox, PlayStation, or any network capable device through Network and Sharing Center. Your computer has to be connected to the VPN, and this can be done using the available software client from your provider of choice, or any other manual setup configuration by preference.
Step 1- Connect your computer to your router using Wi-Fi, or Ethernet. This is a limitation for lots of desktops that don’t always have a wireless adaptor. Using a laptop is usually the best solution, since it can be placed in proximity of the Xbox with ease. Some high end motherboards also have two Ethernet ports, but for the 99%, unless your desktop has Wi-Fi, you must use a laptop’s Wireless capabilities.
Step 2- Setup and Connect to your VPN service either manually, or with the provided software. I highly suggest to change the connection type to UDP to avoid stuttering lag. Most providers have a checkbox for UDP or TCP in the software connection settings.
Step 3- Once your computer is online and connected to the VPN server of your choice, the next step is to connect the Xbox to the computer using an Ethernet cable or by Wi-Fi. Once again, if you don’t have two Ethernet ports, you need to connect the computer by Wi-Fi to the internet, and Ethernet to the Xbox.
Step 4- Get to ‘Network and Sharing Center’ by clicking Start -> Control Panel -> Network and Sharing Center, and click on ‘Change adapter settings’ found on the right column.

Step 5- You may find many protocols here, for both Local (wired) and Wireless. Locate the ‘Local Area Connection’ icon that is labeled ‘Tap-Windows Adapter V9’, as this is the one the VPN connection will utilize when signed in. Right click -> ‘Select Properties’. This next window will allow you to share the internet connection through VPN with your Xbox, PlayStation, or any other device that does not have protocols and connection settings options in the firmware.

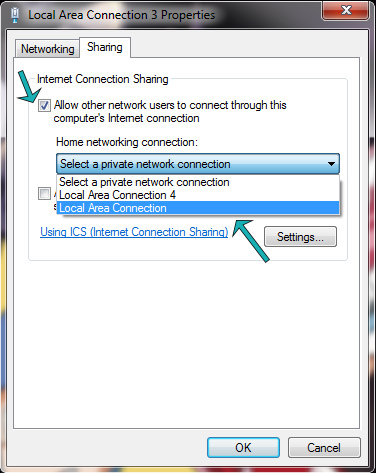 Step 6- Under the Properties window, select the ‘Sharing’ tab up top. Next, check the box that says; ‘Allow other network users to connect through this computer’s internet connection.’ The second check box can be left unchecked for this purpose.
Next, select the private network connection on the drop-down menu ‘Home networking connection:’ and select the main Local Area or Wireless connection that is used to actually connect to the internet. Click ‘Ok’ and Reboot your computer, Done!
Once the computer is restarted, connect to your VPN service and select the network location of your choice. Turn on your Xbox or PlayStation, and it should be able to connect through the internet and tunnel through the encrypted server.
Mac OSX users can find a similar guide on sharing the network through their apple computers here. Although the article is titled for Apple TV, just like this Windows tutorial, it can be used for any device.
Choosing the Best VPN Provider for Xbox or PlayStation
It can be tricky to pick from dozens upon dozens of providers, but what it comes down to is support, quality of service, and fast servers to have the least possible impact on your ping and bandwidth speed between your private server and the gaming network. We have put various providers against each other and selected those with the best setup guides, SmartDNS options, and overall speeds. Keep in mind that VPN services do not fully support game console setups due to the required setup and possible need for a DD-WRT or Tomato router. Consult our top lists for Xbox and PlayStation here;
Using SmartDNS Instead of a VPN for Xbox & PlayStation
Another option I would like to mention is SmartDNS, which allows you to unlock geo-restricted content and dynamically change your location through DNS servers. It can be very useful when using gaming consoles or TV streaming boxes, since it is supported by most of the devices already. You can manually change your DNS server settings on your Xbox, PlayStation, Apple TV and many others, so it does not require any routers, or network sharing through your computer.
What you need to understand, is that SmartDNS does not encrypt or hide any of your data usage. You have no extra protection from the service, but on hindsight, it should have no effect on your bandwidth speed either, which can be important for streaming video. The services often provide full tutorials for gaming consoles and a variety of other devices. You can even setup a SmartDNS router the same way you would with VPN, and have it run for all the connected devices at once. Below are some of the possible options for SmartDNS services that can be used for Xbox & PlayStation.
ExpressVPN – Full Review


If you need a VPN, than I would highly suggest ExpressVPN, as they offer an undisclosed SmartDNS service for PlayStation, Xbox and AppleTV. Once you signup, it will be available in your member’s portal. I have tested it myself on my consoles both old and new, and it ran flawlessly. It allowed me to stream and play games online with no additional ping response lag, or bandwidth loss, while dynamically accessing any region as needed. The setup guides are very easy to follow, and support is available 24/7.
Unblock-Us SmartDNS – Full Review

Unblock-Us offers a complete SmartDNS solution that I found to be way above average. The website portal provides a Netflix region selector able to beat their protection, as well as a huge portal of network broadcasters all across the globe to help you discover all the TV streaming you ever wanted. They have full guides on how to setup service on gaming consoles, with a short 3 minute video for each individual console. The list goes on for just about any other device you can imagine, worth checking out!
Overplay – Full Review

Overplay was a choice that I once disliked, but my friend tested them out after they merged networks with IPVanish, and convinced me to give them a shot. With coverage in over 48 countries, high speeds, and a very detailed broadcast portal on their website, the service is an excellent choice for SamrtDNS. You can also pick a combo package with VPN if you happen to need service for both.
In Conclusion
I hope this information has been able to clarify the possible routes to use a VPN on your game console, and remember that the same applies for PlayStation, Xbox, Wii, and any other device really. The router setup is always best for security, reliability and speed, but if all you can do is network sharing, it’s worth a try, but I found that it would sometimes fail to connect, and I would need to restart devices to get it going. Finally, I do suggest SmartDNS if all you want is to unlock content and have no concern about security, privacy, and encryption of your data. In fact, it may be a good idea to have a VPN router for browsing security and privacy and SmartDNS strictly for media and entertainment. You can combine the two, and use an unsecured network when wanted, gaining the best of both worlds with no compromises in between.
Bruce
September 14, 2016 at 11:43 pmI paid for express VPN. Read through and followed all of the instructions and it still won’t share the laptop connection. I get nothing when trying to get online with the Xbox. Useless – thanks for the effort.