Though VPNs are rock solid and offer many security benefits, they do still have a couple small problems. For example, your VPN will fail to connect if you don’t have the right ports open or if your ISP blocks VPNs across their network (which is a rarity). But the biggest problem is the threat of a DNS leak, which could completely compromise your security and allow entities such as your ISP to be able to analyze and control your data even if you are using your VPN tunnel. Fortunately, we’re going to help you protect yourself so this never has a chance of occurring in the first place.
For those of you who don’t understand DNS, you need to know that this protocol links domain names with IP addresses. Each domain name has its own unique IP address, but humans don’t remember numbers as well as we remember names. So your web browser needs to translate a domain name into a network address before it can send it data. For example, www.reddit.com has the IP address of 198.41.209.140, and DNS binds these two pieces of information together. Most often your ISP provides you with DNS services, meaning that your computer communicates with their DNS servers to determine a website’s IP address.
However, when you use a VPN tunnel, you should use your VPN service’s DNS servers instead of your ISP’s DNS servers. Basically, your DNS requests need to flow through the tunnel instead of bypassing the tunnel and hitting your ISP’s servers. But here’s where things become problematic. Windows (among other systems, but Windows is the largest offender) will often use default values that cause your DNS requests to bypass your VPN tunnel. This scenario is referred to a DNS leak, and it allows your ISP to see every website you connect to – even if you are using your VPN tunnel. You can consult my full guide on how to verify if your VPN connection is secure, but below is an updated summary on how to avoid leaks all together while using a VPN connection.
How to Spot a DNS Leak
You can’t fix a problem unless you know it exists in the first place, but the good news is that it’s not too hard to identify a DNS leak. Just use the online tool and make sure that the IP addresses are familiar. More specifically, if you see IPs that show a location far from your VPN server or ones that are from your ISP, then you have a leak. For example, if you are connecting to a VPN server in the UK but the IP addresses are from your neck of the woods, you have a problem.
VPN Client Settings
The simplest measure you can use to prevent DNS leaks is to enable a DNS leak setting with your VPN client. Some service providers include a checkbox under their settings menu that will enable you to prevent DNS leaks. Unfortunately, there are many software clients that lack this option.
Stand-Alone Software
As an alternative, you can use software called VPNCheck. They offer a free edition that is a little watered down and a pro version that removes service restrictions. After you download it, install it, and run it, simply click on the “Config” button. Then, simply check the box that allows you to enable DNS Leak Fix. You’ll only see this option if you use the paid version of the software, though, as it isn’t present in the free version. After you have enabled this feature, you need to go back to the main screen and either click on Cycle IP: Network or Cycle IP: Task. Though you can use a limited free trial, the paid version of this software costs about $25.00 total. It isn’t a monthly fee, and some people see a lot of value in this because it adds an extra layer of protection ensuring that their ISP won’t accidentally see what they’re up to online.
Setting Static DNS Servers
One of the reasons a DNS leak is allowed to happen in the first place is because of a mechanism called DHCP, which will automatically assign the DNS servers. This is a huge problem because the protocol could inadvertently connect you to a new DNS server when you change networks or as a service goes up and down. To nip this problem in the bud, simply assign a static DNS server that will trump any automatic assignments.
VPN service providers have their own DNS servers and if you contact support they will give you their IP addresses. Some even list them in service documentation. Alternatively, you could statically assign a DNS server using Comodo Secure DNS or OpenDNS. Any one of these services will work since they are not servers controlled by your ISP.
To statically assign a DNS server, the process will vary slightly between different Windows versions. However, the process is more or less the same. In Windows 7 and Windows 8, open the Control Panel, click on the Network and Sharing Centre, and then click on Change Adapter Settings. Right click on the connection you want to edit (either your Ethernet or wireless interface) and click on Properties.
Scroll down to the bottom and look for the IPv4 settings. Click on this option and click the properties button. If you look at the bottom, you will likely already see that DNS servers have been automatically configured. Record these addresses somewhere in case you want to revert your changes. Then, if you wanted to statically configure your connection to use a public DNS simply type the two servers’ IP addresses in the DNS fields. If you want to use another DNS service, you can easily Google other open DNS providers and their servers’ IP addresses.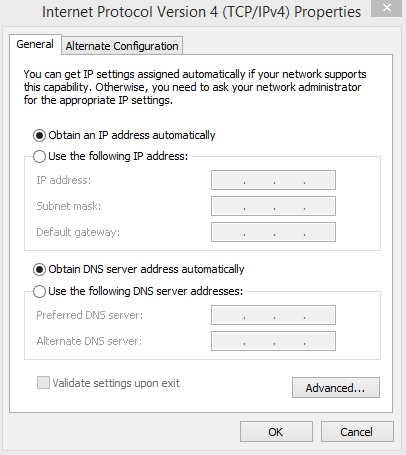
Using a static DNS IP address will ensure that your DNS service doesn’t accidentally get switched to your ISPs DNS service by DHCP. If you statically set your DNS to an open DNS server like Google DNS you will be able to browse the public Internet just about anywhere without a hitch and your ISP will be none the wiser.
However, be forewarned if you use the laptop you made a static DNS assignment on in a work setting. Many times businesses will implement their own private DNS service that only works for hosts connected to their corporate network. If you bring your computer to this type of environment and your network card is statically assigned to use Google DNS, there’s no way you’re going to be able to access internal corporate resources without either typing the IP addresses into your browser manually or switching to automatic assignment.
Windows 10 Warning
The DNS in Windows 10 behaves a little differently than it does in previous versions of the operating system. A feature called “Smart Multi-Homed Name Resolution” will send out DNS queries on different interfaces. By sending out requests to DNS servers at the same time, Windows 10 can find the fastest servers – thereby improving web performance. You should disable this setting if you want to use your VPN tunnel without your ISP knowing what you’re doing.
In Summary
The whole goal of using a VPN is to make sure that your ISP can’t wrongfully snoop around and see what you’re up to. But a DNS leak can easily defeat the purpose of using a VPN tunnel. In addition, you may want to go ahead and setup a VPN kill switch in case your VPN connection drops unexpectedly. While Windows does fall victim to DNS leaks more so than other operating systems, Apple devices and Linux systems are not exempt from having these types of problems – so it is a good idea to check to make sure you don’t have a leak regularly if you use these operating systems.